A dirty barrel is the quietest accuracy killer in your safe. Carbon and copper fouling build up shot after shot, and once they do, your groups open up and your rifle stops performing the way it should. This guide walks you through every step of cleaning a rifle barrel safely and correctly, from first safety check to final oil coat.
Step 1: Unload and Verify Your Rifle Is Safe
Before you touch a cleaning rod, the rifle must be completely unloaded. This is not a step you rush.
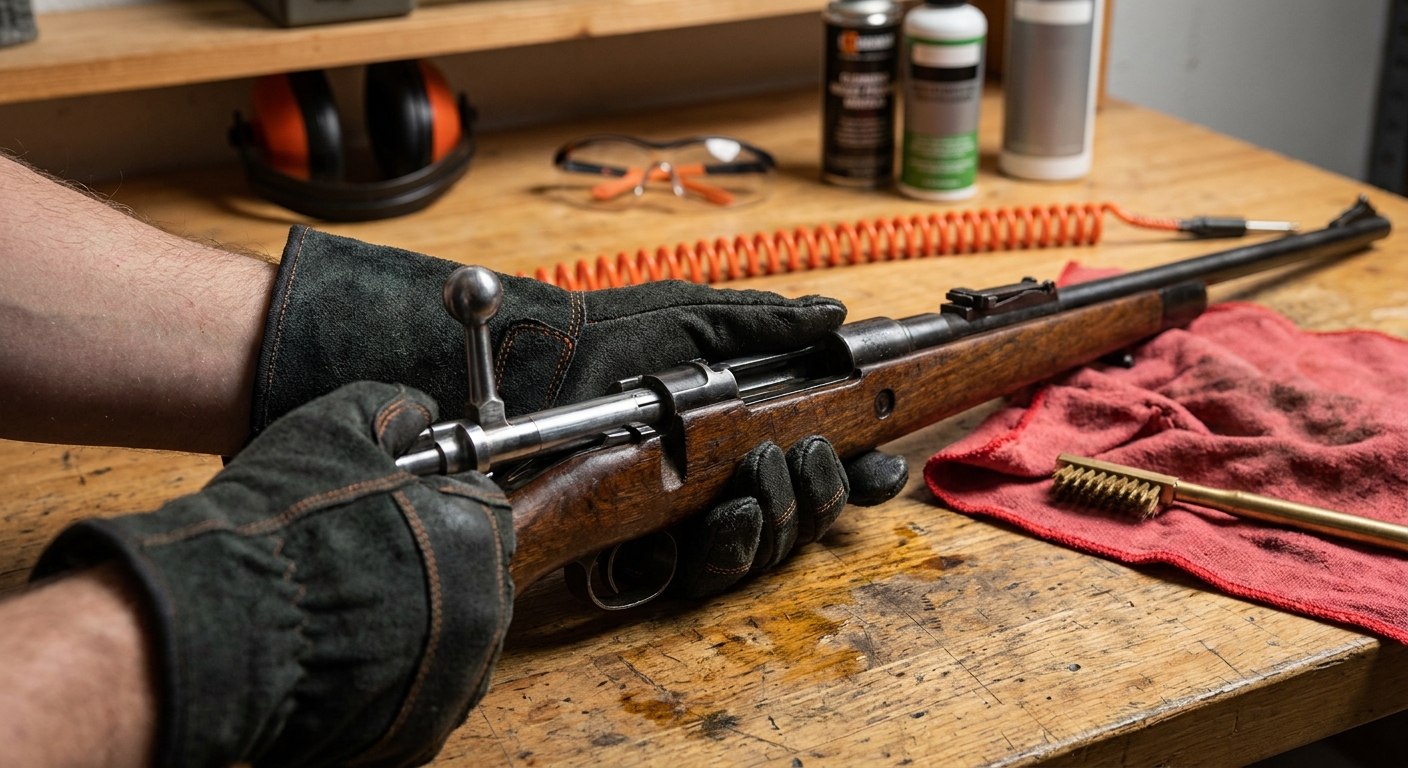
Remove the magazine first. Then open the action and visually inspect the chamber. Look directly into it. If there’s any doubt, run a finger along the chamber wall to confirm it’s empty. Only then should you proceed.
Point the muzzle in a safe direction throughout the entire cleaning session. Keep your finger off the trigger and treat the firearm as if it were loaded even after you’ve verified it isn’t. These are basics, but they matter every time.
Set up on a stable surface, like a gun cradle or a padded bench vise. A stable rifle means you won’t torque the barrel or accidentally drop the action while you work. Good footing at the bench prevents most of the small mistakes that cause real damage during cleaning.
We believe safe handling is non-negotiable. At 31 M Armory’s handgun cleaning guide, we carry that same standard into every firearm maintenance article we publish.
Step 2: Disassemble and Gather Your Cleaning Tools
For most bolt-action rifles, you only need to remove the bolt to access the barrel from the breech end. For semi-auto platforms, follow your manufacturer’s field-strip instructions. You don’t need to fully disassemble the rifle for a standard barrel cleaning.
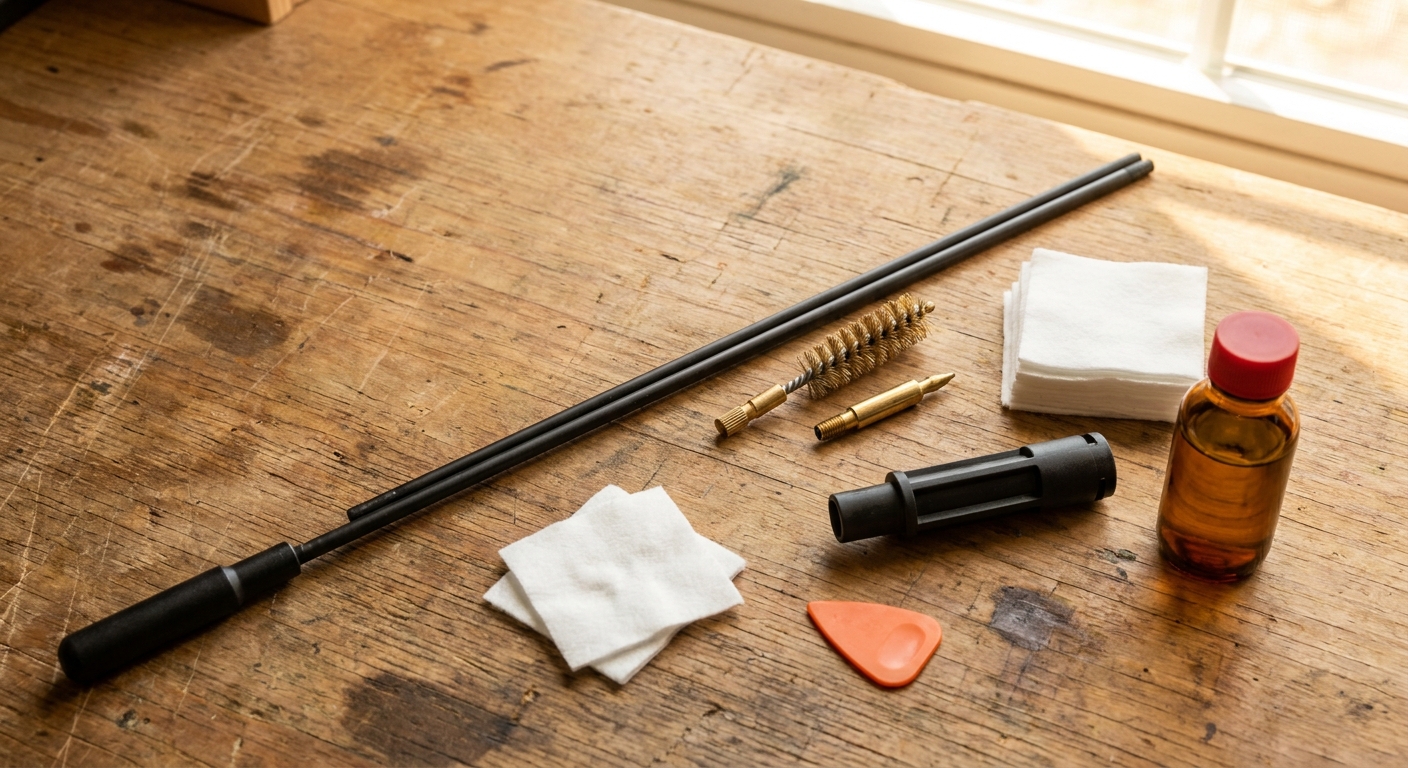
Here’s what you need on the bench before you start:
- A one-piece coated cleaning rod (Teflon or similar non-abrasive coating)
- A caliber-specific bore guide with an O-ring
- A phosphor-bronze brush in your caliber
- A slotted jag or patch holder in your caliber
- Cotton cleaning patches
- A bore solvent (more on choosing one in Step 3)
- A light gun oil or rust-inhibiting lubricant
- A chamber mop for final chamber cleaning
The bore guide is the one tool many shooters skip, and it’s the one they shouldn’t. It consistently gets flagged as a critical first step by experienced gunsmiths and shooters alike. The guide keeps your cleaning rod centered in the bore and prevents the rod from wearing against the rifling, especially at the throat and leade where contact is most damaging. The O-ring on most bore guides also stops solvent from draining back into the trigger group and action.
One-piece rods matter too. Segmented or cable rods flex inside the barrel and can create uneven contact with the rifling. A coated one-piece rod stays straight and won’t deposit grit into your bore from dirty threaded joints.
If you’re looking to put together a solid kit, our comparison of the top gun cleaning kits covers what’s worth buying versus what’s just filler.
Step 3: Choose the Right Solvent for Your Fouling Type
Two types of fouling accumulate in a rifle barrel, and they respond differently to solvents. Knowing which one you’re dealing with saves time and protects your bore.
Carbon fouling is the black, sooty residue from burning powder. It builds up quickly but cleans out relatively easily with a standard bore solvent. A classic bore solvent works well here — it loosens carbon fast, leaves a light anti-corrosion film, and has been trusted by generations of shooters.
Copper fouling is more stubborn. Every time a jacketed bullet travels down the bore, it smears thin layers of copper into the rifling’s pores and micro-fractures. This is the fouling that eventually kills accuracy. Faster cartridges, like magnums or high-velocity varmint loads, deposit copper more aggressively than slower rounds.
For copper, you need a dedicated copper-removing solvent. The key thing to check on any label: it must specifically state it removes copper. Several well-regarded options work through chemical action rather than abrasion, which means less mechanical wear on your bore.
Be careful with ammonia-based solvents. Ammonia dissolves copper efficiently, but it can also etch the steel in your barrel if left in too long. The compound is highly reactive with metals at certain concentrations. Most experienced gunsmiths limit contact time to under 15 minutes with ammonia formulas and follow up with a thorough flush. Ammonia-free copper solvents take a little longer to work but carry far less risk of bore damage with extended dwell time.
For most field rifles and hunting guns, a two-solvent approach works well: a carbon solvent first to clear the bulk of fouling, then a copper remover if you’re seeing blue or green color on your patches. If you shoot a lot, checking our breakdown of the best gun cleaning solvents will help you match the right product to your caliber and shooting volume.
Step 4: Run the Brush and Patches Through the Bore
With the bore guide seated in the action, you’re ready to start moving solvent and fouling out of the barrel.
Start with a wet patch. Attach your jag to the cleaning rod, place a cotton patch over it, and saturate it with your chosen solvent. Run it through the bore from breech to muzzle. This is the only direction you should push the patch. Remove it at the muzzle and do not drag it back through the bore, because pulling a fouled patch backward deposits the grit it just picked up right back into the rifling.
Run two or three wet patches through this way to pre-soak the bore and soften the fouling layer.
Now attach your phosphor-bronze brush. Wet it lightly with solvent and push it through the bore in long, steady strokes, breech to muzzle and back. Let the brush exit fully at each end before reversing direction. Around 20 passes with a bronze brush is a solid working target for a moderately fouled barrel. A very dirty bore may need more; a lightly fouled one after a short range session may need fewer.
After brushing, switch back to the jag with fresh wet patches. Run them through one at a time. The first few will come out dark blue, green, or black depending on your fouling type. That’s normal. Keep going until the patches come out with significantly less color. You’re not necessarily chasing a perfectly white patch on the first cycle, especially with a heavily fouled barrel. Let the solvent dwell for 10 to 15 minutes, then run another series of patches. Repeat until the color change on each pass is minimal.
Always clean from the breech toward the muzzle. The muzzle crown is precision-ground and directly affects accuracy. Protecting it from rod contact is something every guide and experienced shooter agrees on. A damaged crown can scatter groups in ways that no amount of scope adjustment will fix.
Many hunters and competition shooters also keep a dedicated set of cleaning supplies for the field, separate from their bench kit, so they can do a quick clean between range sessions without breaking out the full setup.
Step 5: Follow Up with Dry Patches and a Light Oil Coat
Once your wet patches are coming out nearly clean, the solvent has done its job. Now you need to dry the bore completely before applying any oil.
Run dry patches through the bore one at a time, replacing each patch after a single pass. They’ll pick up residual solvent and any last bits of loosened fouling. Keep going until a dry patch comes out clean and dry. A properly dried bore will feel slightly more resistant to the patch, almost a soft, grippy friction as you push it through. That’s the steel surface without a solvent film on it.
Don’t skip this step. Solvent left in the bore under an oil coat doesn’t neutralize; it gets trapped and can continue working on the metal. This is especially true with any ammonia-based product.
Once the bore is dry, apply a very light coat of gun oil. Dampen a clean patch with oil and run it through once. Then run a second dry patch through to remove most of that oil, leaving just a thin protective film. The goal is a light barrier against moisture and oxidation, not a soaked bore. Too much oil in the chamber area can cause pressure irregularities when the brass case can’t grip the chamber wall properly during firing.
Use a chamber mop to clean and dry the chamber itself separately. The chamber should stay dry. No oil in the chamber.
Wipe down the bolt body and bolt face with a lightly oiled cloth, add a small amount of grease to the locking lugs, and then reassemble. Function-check the rifle before storing it in a dry, secure location.
Proper shoulder mechanics matter here too. If you regularly shoot higher-recoil rifles and feel strain after long bench sessions, it’s worth knowing that sports rehabilitation resources offer structured recovery approaches for shooters dealing with shoulder fatigue or injury.
How Often Should You Clean Your Rifle Barrel?
The honest answer is: it depends on what you’re shooting and how you’re using it.
A usable rule many experienced shooters follow is cleaning after every 15 to 20 rounds for rifles used in precision shooting or hunting. One gunsmith in The Real Gunsmith’s YouTube series makes this point directly: let the round count get above that threshold and you’re adding copper on top of copper, making each subsequent cleaning harder and more time-consuming. For a hunting rifle that sees 20 rounds a season, you may clean it once thoroughly after that range session and once before the season opens.
For high-volume range rifles, like an AR-platform used for target practice, a quick bore snake run after each session keeps fouling from hardening, and a full cleaning every 200 to 300 rounds handles the deeper copper buildup. The rifle will tell you when it needs attention. Watch for groups opening up, pressure signs on brass, or patches that come out deeply colored even after the first few passes.
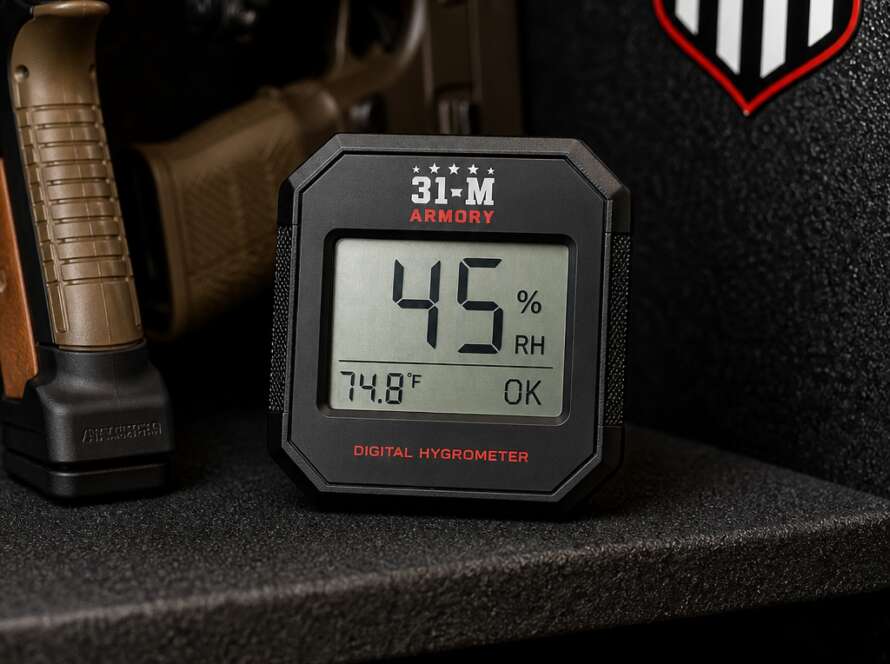
Storage matters just as much as cleaning frequency. A rifle stored in a humid environment can develop surface rust in the bore within days of a cleaning session if there’s no protective oil coat. Keep storage conditions as dry and stable as possible. The same principle applies to home systems maintenance, whether you’re maintaining firearms or household equipment like heating systems. Small, regular attention prevents larger problems down the line, a point that anyone who’s dealt with a finicky gas fireplace that keeps going out from neglected components understands well.
We proudly serve hunters, veterans, and responsible gun owners at 31 M Armory. If you’re building out a complete maintenance setup, browse our selection of firearms and cleaning gear at our top solvent picks page to find the right products for your rifle and your shooting habits. Veterans always have our six , and we back that with a 6% discount on every order.
FAQ
How do I know when my rifle barrel is clean enough?
Your barrel is clean enough when dry patches stop picking up significant color after solvent passes. For carbon fouling, patches should come out gray or light tan. For copper fouling, the blue or green tint on patches should be faint or gone. A perfectly white patch isn’t always achievable in one session on a heavily fouled barrel, so two or three cleaning cycles may be needed.
Can I clean a rifle barrel from the muzzle end?
You can, but it’s not ideal. Cleaning from the muzzle risks contact between the rod and the crown, which is the precision-ground edge at the muzzle that most affects accuracy. If your rifle design forces muzzle-entry cleaning, use a muzzle guide to center the rod and minimize crown contact. Breach-end cleaning with a bore guide is always the preferred approach.
What happens if I leave solvent in the barrel overnight?
With ammonia-free copper solvents, a longer dwell time can actually help dissolve stubborn fouling. With ammonia-based solvents, leaving them in overnight risks etching the steel in the barrel’s micro-fractures. Always check your solvent label for maximum recommended dwell time. When in doubt, flush with dry patches and a light oil coat before storage.
Do I need to clean a new rifle barrel before shooting it?
Yes. New barrels often have machining oils, metal shavings, and surface residue from the manufacturing process. Run several dry patches through first, then wet patches with a mild solvent until they come out clean. Some barrel makers also recommend a break-in procedure of alternating shots and cleanings for the first rounds to smooth the bore surface.
Is a bore snake as good as a full cleaning rod kit?
A bore snake is a solid option for a quick clean after a range session or in the field. It moves solvent through the bore and picks up loose fouling in one pass. For deep cleaning and copper removal, though, a full rod, bronze brush, and patch system lets you soak, scrub, and inspect with more control. Use the bore snake for maintenance, and the full kit for thorough cleaning.
How do I clean the rifle barrel on a semi-automatic rifle differently?
The bore-cleaning process is nearly identical. The main difference is disassembly. On most semi-autos, a full field strip is needed to access the barrel from the breech end. If your design doesn’t allow breech-end entry, use a muzzle guide. Also clean the gas tube, gas block, and bolt carrier group, since semi-autos accumulate carbon in those components faster than bolt-action rifles do.
Keeping Your Rifle Ready
A clean barrel is a reliable barrel. The process takes 20 to 30 minutes done right, and it keeps your accuracy consistent shot after shot. Work from the breech, use a bore guide every time, match your solvent to your fouling type, and never skip the dry-patch and light-oil finish. If you want to extend this same care to the rest of your collection, our step-by-step shotgun cleaning guide covers that process in the same level of detail.