Missing a tight zero can waste ammo and ruin a hunt. You’ll feel the frustration of a wide group and wonder why the scope feels off. In this guide we walk you through every step you need to sight in a rifle, from a quick bore‑sight to the final fine‑tune. By the end you’ll have a reliable zero and a workflow you can repeat each season. For a step-by-step walkthrough of the zeroing process itself, see our guide on how to zero a rifle scope.
Step 1: Prepare Your Rifle and Workspace
Before you touch the scope, make sure the rifle is clean and the workspace is stable. A dusty barrel can throw off your bore‑sight, and a wobbly bench will add unwanted error.
Start by wiping the barrel with a lint‑free cloth. Remove any fouling, oil, or debris. Then check the bolt and action for smooth operation. If the bolt sticks, spray a light coat of lubricant and work it back and forth a few times.
Next, set up a solid work surface. A gun vice attached to a sturdy table works best. The vice holds the rifle level and prevents it from shifting while you adjust the scope. Make sure the vice clamps the stock, not the barrel, to avoid warping.
Gather the tools you’ll need: a torque wrench for the scope rings, a screwdriver for turret caps, and a cleaning kit for the barrel. For a full list of gear, check out our guide on must‑have AR‑15 accessories.
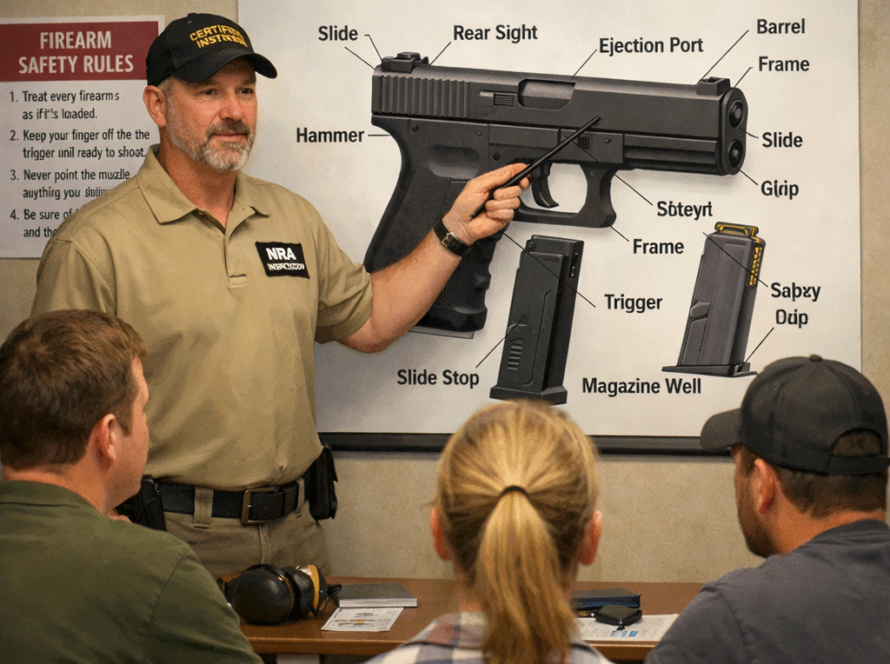
Safety is a must. Unload the rifle, remove the magazine, and keep the bolt open. Double‑check that the chamber is empty. A safe workspace lets you focus on precision, not on accidental discharge.
Take a moment to set your shooting position. Whether you sit on a bench or stand with a sandbag, keep the shoulder stock snug and the cheek weld consistent. A repeatable position reduces variance when you fire the first groups.
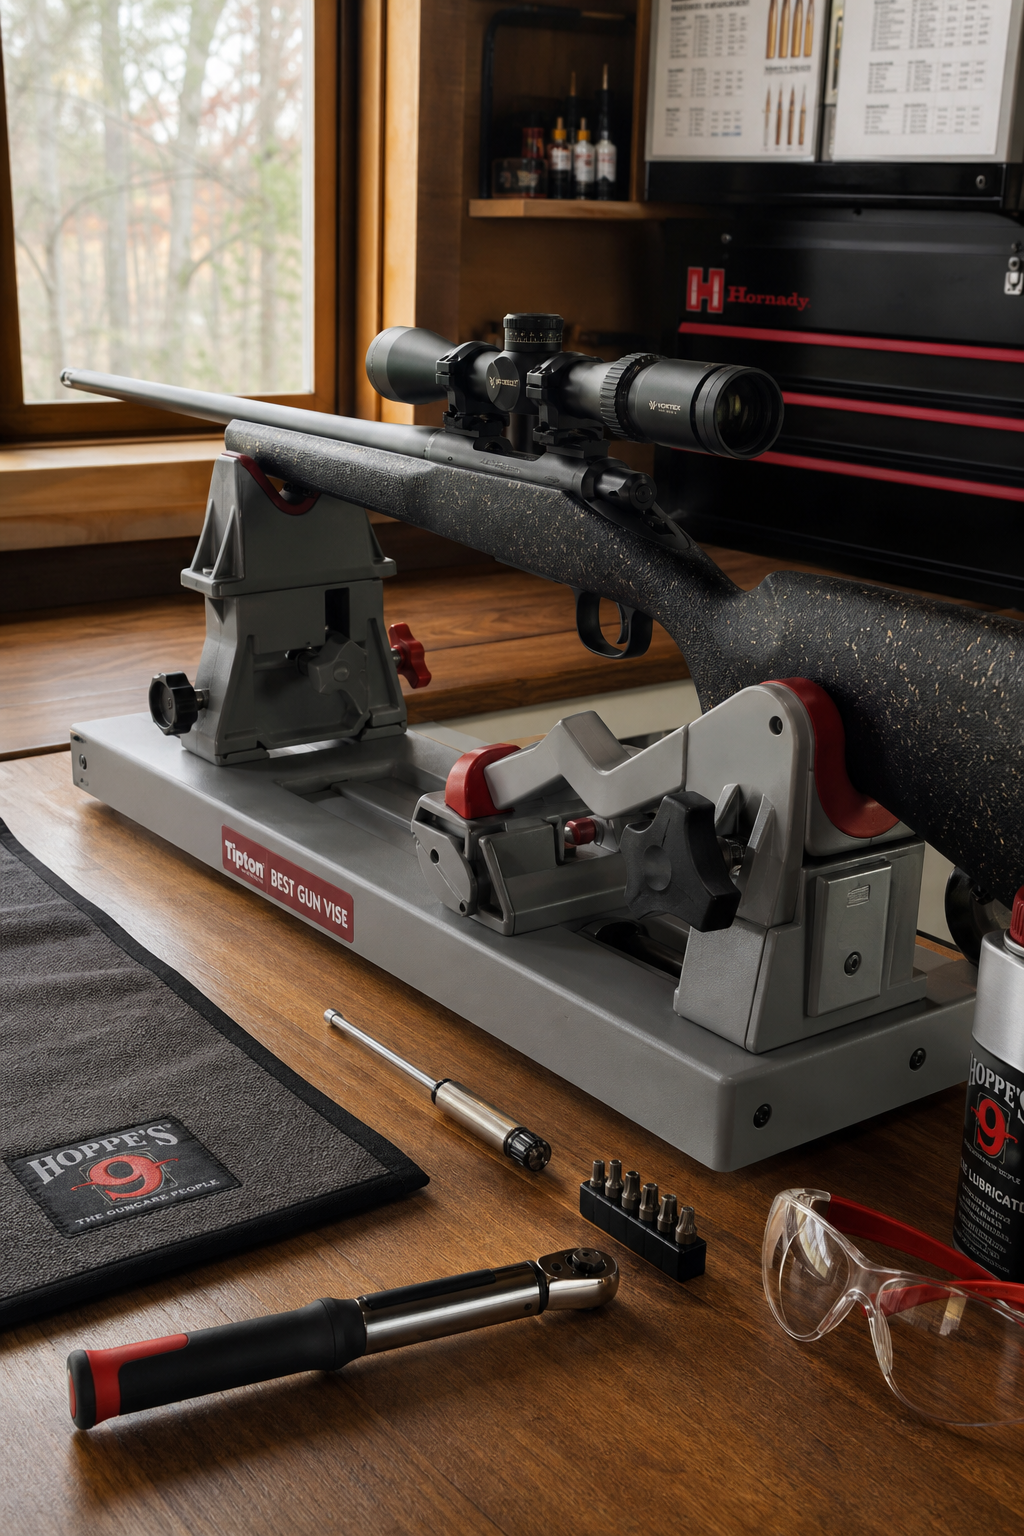
Finally, double‑check that your scope rings are the correct size for your tube. Mismatched rings cause cant and shift the point of impact. Tighten the rings to the manufacturer’s recommended torque, usually between 5‑7 inch‑pounds, for most 30‑mm rings.
We believe a clean rifle and a solid workbench are the foundation of a good zero. Skipping this prep step often leads to wasted ammo later.
Step 2: Bore Sight Your Rifle
Bore sighting gets the reticle close to the bullet’s path before you fire live rounds. It saves time and ammo, especially when you’re using a new scope.
There are two common methods: a laser boresighter or a traditional rod‑type kit. Laser kits snap into the chamber or muzzle and project a dot on the target. Rod kits use a set of steel rods that sit in the barrel and line up with a grid inside the scope.
Start by setting a target at 25 yards. A large bullseye works best for quick alignment. Place the rifle in the vice, remove the turret caps, and expose the adjustment knobs.
If you use a laser boresighter, insert it into the chamber (or muzzle if your rifle has a muzzle brake). Turn the laser on and aim at the target. Adjust the scope’s windage and elevation until the laser dot sits in the center of the reticle.
For a rod kit, insert the rods into the barrel as described in the manual. Look through the scope and align the grid overlay with the target. Then turn the turrets until the reticle matches the grid’s center.
Remember that adjusting the turrets moves the reticle opposite to the bullet’s impact. If the reticle is left of center, turn the windage knob right to move the reticle left.
Once the reticle is centered, lock the turrets if your scope has a zero‑stop feature. This prevents accidental movement during transport.
According to Wikipedia’s bore‑sighting entry, a proper bore sight should place the bullet within one inch of the point of aim at 25 yards. That gives you a solid starting point for live fire.
We recommend repeating the laser alignment a few times to confirm consistency. Small shifts can happen if the rifle settles in the vice.
After you’re satisfied, remove the boresighter, replace the bolt, and reload a single round for the next step.
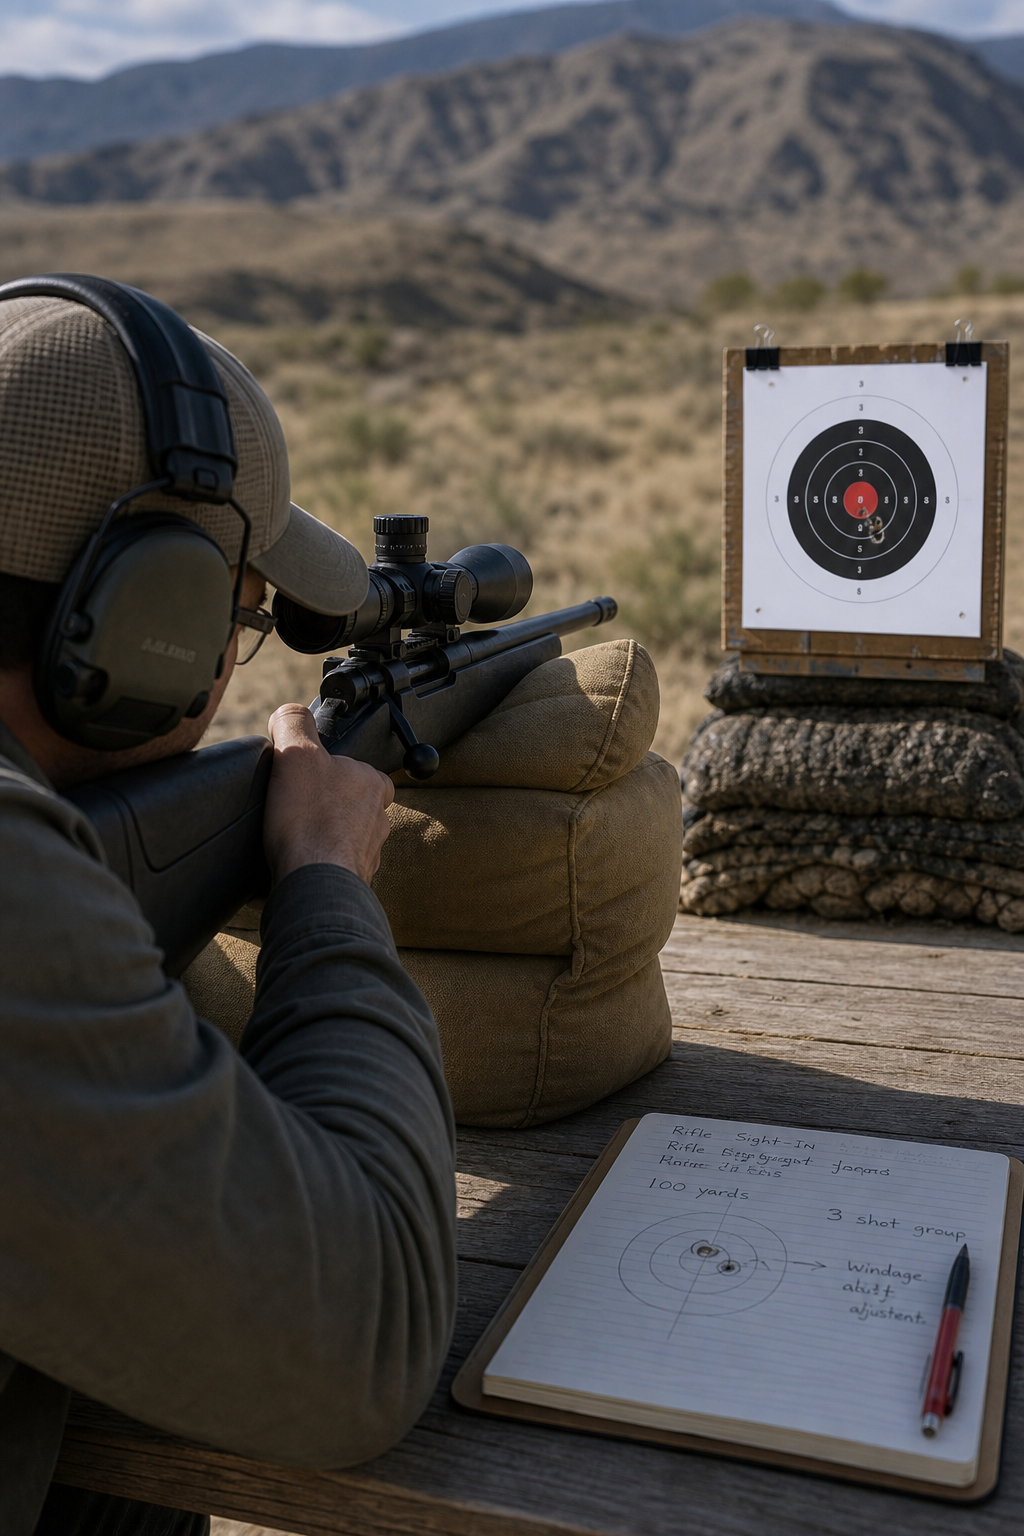
Step 3: Set Up a Target at the Right Distance
Choosing the right distance for your zero depends on your intended use. Hunters often zero at 100 yards, but long‑range shooters may prefer 200 or 300 yards.
The research shows most shooters pick 25 yards for bore‑sighting, then move to 100 yards for the first live‑fire group. The median zero distance across guides is about 30.5 yards, but the most common is 25 yards.
For a versatile zero, aim for a point‑blank range that covers your typical hunting distances. If you hunt mostly under 150 yards, a 25‑yard zero that lands three inches high at 100 yards works well. For elk hunting, our guide on the best rifle for hunting elk can help you select the ideal cartridge and zero.
Set up a sturdy target stand at the chosen distance. Use a target with a clear bullseye and 1‑inch reference squares. You can print a standard NRA 1‑inch grid target on an 8½ × 11 inch sheet.
Make sure the target is square to the line of fire. Use a plumb line or a laser level to verify that the target face is perpendicular to the barrel’s axis.
When you’re ready, place a sandbag or rest behind the target to catch stray rounds and keep the paper flat.
We like to double‑check the distance with a tape measure or a laser rangefinder. A small error in distance can throw off your calculations, especially when you later adjust for bullet drop.
For more on choosing a zero distance for specific cartridges, see resources on optimal sight‑in distances for common hunting rounds. It breaks down how a 25‑yard zero translates to point‑blank range for .308 Win, 6.5 Creedmoor, and others.
Once the target is set, you’re ready to fire the first three‑shot group.
With the target in place, you can move on to firing the first group.
Step 4: Fire a Three‑Shot Group and Adjust Windage
Now it’s time to fire. Load three rounds of the ammo you plan to use for hunting or competition. Consistency matters, so keep the same load for all adjustments.
Assume a stable shooting position. Rest the rifle on a sandbag or bipod, keep the cheek weld the same as during bore‑sighting, and squeeze the trigger smoothly.
Fire the three shots at the target’s bullseye. Aim for the center of the bull. After the shots, examine the impact points.
If the group is left of center, you need to adjust windage to the right. Turn the windage knob clockwise, each click typically moves the point of impact 1 MOA (or ¼ MOA at 100 yd) depending on your scope’s specifications.
Use the scope’s elevation knob only if the group is high or low. For this step we focus on windage because a three‑shot group will reveal left/right bias most clearly.
Record the number of clicks you move. Write it down in a notebook. If you moved five clicks right, you’ll need to move five clicks left to return to zero.
Repeat the process: fire another three‑shot group after each adjustment until the impacts land within one inch of the bullseye. This may take a few cycles, but it ensures a solid baseline.
Once you’re within the one‑inch zone, you’ve achieved a functional zero at the chosen distance. The next step is to confirm that zero with additional groups.
We believe that taking the time to fine‑tune windage now saves you from larger corrections later in the field.
Step 5: Fire Additional Groups to Confirm Zero
A single three‑shot group tells you where the rifle is pointing, but you need more data to be sure the zero is stable.
Load a second set of three rounds and fire at the same aiming point. Do not adjust the scope between the two groups. The goal is to see how the rifle behaves with fresh ammo and a cooled barrel.
If the second group lands close to the first, you’ve likely achieved a true zero. If it drifts, note the direction and make a final correction.
Many shooters collect multiple groups and then plot the points on a single sheet of paper. This method, described by a popular outdoor publication’s zeroing article, lets you calculate the mean radius and make a single precise adjustment.
For a more data‑driven approach, use a free group‑analysis app. Take a photo of the target, import it into the app, and let the software compute the exact offset.
Once you have the final offset, turn the appropriate turrets the exact number of clicks. Then fire a final three‑shot group to verify that the impact now sits on the bullseye.
At this point, you should have a repeatable zero. Write down the final click settings, the ammo brand and load, and the distance you zeroed at. This record will help you restore the zero if you ever remove the scope.
We recommend repeating this confirmation after the barrel has cooled for at least ten minutes. Heat can shift the point of impact slightly.
For more on the science behind group size, see the Wikipedia article on external ballistics, which explains how velocity, drag, and gravity affect bullet flight.
Now that the zero is locked, you can move on to fine‑tuning for specific ammo and distances.
Step 6: Fine‑Tune for Your Preferred Ammo and Distance
Even with a solid zero, different loads can shift the point of impact. Factory ammo, handloads, and different bullet weights each have unique velocities.
Start by selecting the exact ammo you plan to use in the field. Load a single round, fire, and note where it lands relative to the bullseye.
If the impact is high, lower the elevation knob; if low, raise it. Make small adjustments, most scopes move ¼ MOA per click at 100 yd, so a one‑click change moves the impact about 0.25 in.
Repeat the process with a second round to confirm the adjustment. Once two consecutive shots land on target, you’ve tuned the scope for that ammo.
If you plan to shoot at multiple distances, consider a “tiered zero.” For example, a 25‑yard zero that lands three inches high at 100 yards gives you a flat trajectory out to 300 yards without dialing the scope.
Use a ballistic calculator or a phone app to see how different loads affect drop. Input bullet weight, muzzle velocity, ballistic coefficient, and zero distance. The calculator will tell you the expected point of impact at any range.
When you change ammo, repeat the fine‑tune steps. It’s a quick process, usually two or three clicks max.
We proudly stock a full line of quality scopes, rings, and boresighters at 31 M Armory. Veterans can grab a 6% discount on any of these items, making it easy to get the right hardware for your sight‑in workflow. Don’t miss our product specials for even more deals.
Don’t forget to re‑check your zero after a long day on the range. Temperature changes and barrel heating can shift the point of impact by a fraction of an inch.
With the scope dialed in for your favorite load and distance, you’re ready for the field. Your rifle will now deliver tight groups and reliable hits.
Frequently Asked Questions
What distance should I use for my first zero?
Most shooters start with a 25‑yard bore‑sight, then fire a three‑shot group at 100 yards. This distance balances convenience and accuracy. If you hunt at longer ranges, you may opt for a 200‑yard zero, but 100 yards works for the majority of hunting scenarios.
How many shots do I need to confirm a zero?
We recommend at least two separate three‑shot groups at the same distance. Plotting the points on a single sheet lets you see the overall pattern and make a single, precise adjustment.
Do I need a laser boresighter?
A laser boresighter speeds up the process, especially with a muzzle brake. It eliminates the need to look down the bore. However, a traditional rod kit works just as well if you prefer a low‑tech solution.
Can I zero my rifle at home?
Yes, as long as you have a safe backstop, a stable workbench, and a proper target. Follow all safety rules: unload the rifle, keep the bolt open, and wear eye protection.
What if my scope’s clicks are too coarse?
Some scopes move 1 MOA per click, which equals 1 inch at 100 yards. If you need finer control, look for a scope with ¼ MOA clicks or use a tactical reticle that lets you make micro‑adjustments.
How often should I re‑check my zero?
After each major shooting session, especially if the barrel got hot, fire a quick three‑shot group to verify the point of impact. Also re‑zero when you change ammo, swap out the scope, or replace the mounting hardware.
Do environmental factors affect my zero?
Yes. Wind, temperature, and altitude all influence bullet flight. While they won’t change the mechanical zero, they can shift the point of impact enough to require hold‑over or scope dialing in the field.
Is it okay to use the same zero for both hunting and target shooting?
Often it is. A 25‑yard zero that lands three inches high at 100 yards works well for most deer hunting distances and also provides a solid baseline for target shooting up to 300 yards.
Conclusion
Getting a reliable zero is a mix of preparation, methodical testing, and a little patience. Start with a clean rifle and a sturdy workbench. Bore‑sight at 25 yards, then fire a three‑shot group at your chosen distance. Adjust windage, confirm with additional groups, and fine‑tune for the exact ammo you’ll use. Keep a record of your click settings and revisit the zero after long shoots or temperature swings.
At 31 M Armory we offer every tool you need, bore‑sighters, quality scopes, mounting kits, and more, so you can follow these steps without hunting for parts. Use the guide, practice the routine, and you’ll spend less time chasing missed shots and more time enjoying the hit.
Ready to put the process into action? Browse our selection, claim your veteran discount, and start sighting in with confidence.