Keeping a handgun clean isn’t a chore if you follow a clear plan. Most shooters skip a step or two and end up with jams or reduced accuracy. In this guide we walk you through every action you need, from pulling out the right supplies to testing the gun after you reassemble it. You’ll get practical tips, safety checks, and a realistic timeline so you never wonder what to do next.
By the end you’ll be able to clean any common pistol in under an hour, feel confident about each safety step, and know how to keep the gun reliable for years. Let’s get started.
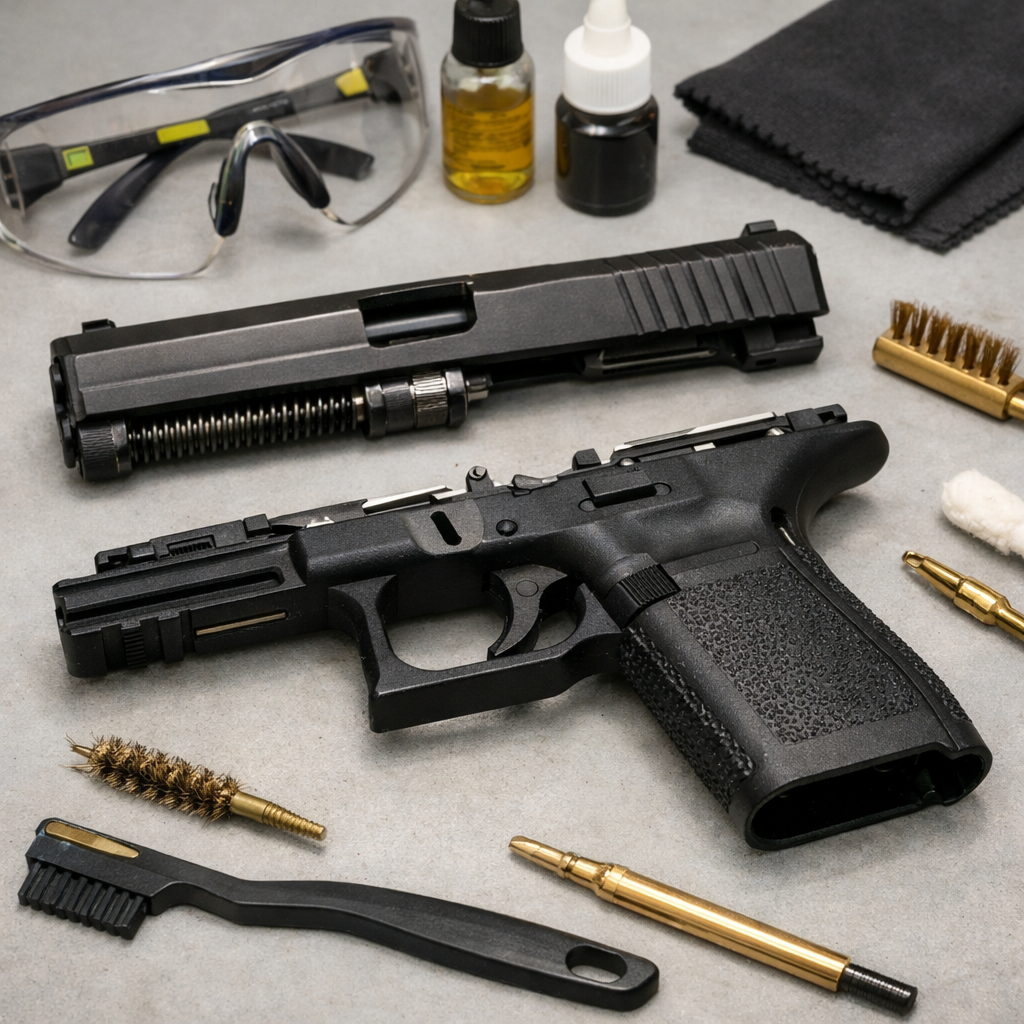
Step 1: Gather Your Cleaning Supplies
Before you touch the gun, set up a clean workspace. A sturdy table, a good light, and a ventilated area keep the job safe and tidy.
Here’s the core kit we recommend. A copper or bronze bore brush matches most calibers, a set of nylon patches, a jag or loop to push patches, and a multi‑section cleaning rod. Add a small bottle of bore cleaner, a drop‑per‑ounce gun oil, and a soft microfiber cloth for the exterior.
Make sure each tool matches the barrel size of your pistol. A mismatched brush can scratch the bore, which hurts accuracy.
Don’t forget safety gear. Safety glasses protect your eyes from spring debris, and nitrile gloves keep chemicals off your skin.
We also suggest a brass‑head hammer and a set of gun‑specific screwdrivers. They let you tap stuck parts without marring metal.
If you need a ready‑made kit, check out our curated list of top kits for 2026. Best Gun Cleaning Kit 2026: Top 5 Picks breaks down price, features, and what each includes.
When you have all the tools, you’ll spend less time hunting for parts and more time getting the job done right.
Bottom line:Gather the right supplies first, and the rest of the process will flow smoothly.
Step 2: Disassemble the Handgun Safely
Safety starts with an unloaded gun. Point the barrel downrange, remove the magazine, and pull the slide back to inspect the chamber. Double‑check a few times , a live round can turn a clean into a disaster.
Next, put on safety glasses. Springs can pop out at high speed and hurt your eyes.
For most pistols, the slide releases with a small push on the rear. Pull the slide about a tenth of an inch back, then push it forward to free it from the frame.
Now the recoil spring is exposed. Gently push it forward and set it aside. It’s under tension, so handle it with care.
Finally, lift the barrel out using the notches on the side. It should slide out without force if the gun is properly field‑stripped.
These steps work for Glock‑style pistols and many other semi‑autos, but always consult your owner’s manual for model‑specific quirks.
According to Wikipedia’s firearm cleaning page, proper disassembly prevents fouling from building up where moving parts meet, which is key for reliability.
Take a moment to inspect each piece for wear or corrosion before you clean.
Bottom line:Disassembly is quick if you follow safety steps and handle springs gently.
Step 3: Clean the Barrel and Slide
Start with the barrel. Attach the appropriate bore brush to the cleaning rod, dip it in solvent, and run it from the breech (chamber) end toward the muzzle. This protects the crown and avoids damage.
Run the brush a dozen times, then pull a dry patch through to wipe out loosened fouling. If the patch comes out dirty, repeat with a fresh one.
When the barrel looks clear, run a final patch soaked in a thin layer of gun oil. This protects the bore from rust.
The slide holds the recoil spring and extractor. Spray a light mist of cleaner on the slide, let it soak for a minute, then scrub with a nylon brush.
Pay special attention to the feed ramp and extractor notch , these spots collect powder residue that can cause feeding failures.
After scrubbing, blow out debris with canned air or a clean, dry patch.
Once the slide is dry, apply a thin line of lubricant along the rails. Too much oil can attract dust, which is why a light coat works best.
The ATF advises that cleaning solvents should be used in a well‑ventilated area ( ATF safety guidance). Follow that rule to keep fumes low.
Bottom line:A clean barrel and slide restore accuracy and reliability.
Step 4: Clean the Frame and Internal Parts (Video)
The frame houses the trigger, safety, and magazine well. Lay the parts on a rubber‑backed mat to keep them from slipping.
Start with a soft brush dipped in solvent. Work the brush into the trigger mechanism, the safety lever, and the magazine release.
Use a tiny dental pick or a pipe cleaner for hard‑to‑reach spots like the sear and firing pin channel.
When the frame feels dry, wipe it down with a microfiber cloth. This removes any remaining solvent and leaves a smooth surface.
Do not lubricate the frame unless the manual says to. Over‑lubricating can pull grit into moving parts.
Magazines also need cleaning. Disassemble them if you can, brush out residue, and dry them. Skip oil on magazines , it can cause feeding issues.
“A clean pistol fires like a well‑tuned engine , smooth and reliable.”
We at 31 M Armory often see shooters skip frame cleaning and then wonder why the trigger feels gritty. A quick wipe saves time later.
Bottom line:A clean frame and internals keep the gun’s action crisp and dependable.
Step 5: Reassemble, Lubricate, and Function Test
Line up the barrel with the slide’s rear lug, then push the slide back onto the frame. Make sure the barrel sits flush.
Re‑insert the recoil spring into its slot, then snap the slide forward until it locks.
Check that the slide moves freely back and forth. If it sticks, double‑check that no debris remains.
Now add a drop of lubricant to the slide rails, the trigger pivot, and the safety lever. Use just enough to coat the metal; wipe away excess.
With the gun back together, do a function test. Pull the slide back, release it, and watch it lock back on an empty chamber. Pull the trigger , it should not fire. Engage the safety and pull the trigger again; the gun should stay inert.
Finally, insert a dummy round, rack the slide, and watch the feeding cycle. If everything moves smoothly, you’re good to go.
Bottom line:Proper reassembly, light lubrication, and a quick function check ensure the handgun is ready for safe use.
FAQ
How often should I clean my handgun?
We suggest cleaning after every range session or any time the gun has been exposed to moisture or dust. If you shoot in salty or humid conditions, clean the gun within an hour to prevent corrosion. Regular maintenance keeps the action smooth and the barrel accurate.
What type of solvent is safest for indoor cleaning?
A water‑based bore cleaner with a mild detergent works well in a garage or indoor range. It cleans fouling without harsh fumes. Always wear gloves and work in a ventilated area, as recommended by the ATF.
Can I use steel brushes on my pistol?
Steel brushes can scratch the barrel finish and should be avoided. Stick with copper or bronze brushes that are soft enough to remove fouling but gentle on metal.
Do I need to lubricate the magazine?
No. Adding oil to a magazine can cause the follower to stick and lead to feeding failures. Keep the magazine dry, clean it with a brush, and let it air dry.
What safety gear should I wear while cleaning?
Safety glasses are a must to protect your eyes from spring snaps and debris. Nitrile gloves keep chemicals off your skin, and a dust mask helps with solvent fumes in tight spaces.
How long does a full cleaning usually take?
With a complete kit and a quiet workspace, most shooters finish in 30‑45 minutes. The biggest time‑savers are having the right tools on hand and following a step‑by‑step checklist.
Is it okay to clean a gun at the range?
Many ranges provide cleaning stations, but bring your own solvent and patches. A portable cleaning mat helps keep the area tidy and protects the gun’s finish.
What should I do if a spring pops out during disassembly?
Stop, put on safety glasses, and let the spring settle. Use a pair of long‑nose pliers to gently guide it back into its slot. Never force a spring with your fingers.
We hope this guide gives you the confidence to keep your handgun in top shape. Clean guns fire better, last longer, and stay safe for you and those around you. If you’re ready to stock up on the right tools, check out our curated list of the best cleaning kits for 2026. Best Gun Cleaning Solvent 2026: Top Picks offers expert‑tested options that match the steps we covered.
Stay safe, stay sharp, and keep your six ready for any situation.